4. Course Content: the Multimedia Book
Where: sidebar → Course Content → Multimedia Book
(/courseware/course/{courseId}/content/multimedia)
The Multimedia Book is your course’s teaching material: videos, documents, links, and quizzes, organised into chapters.
4.1 How content is structured
Chapter
  └── Section
        └── Video · Quiz · Document · URL
You can also place a video, quiz, document, or URL directly in a chapter without a section.
The word “Chapter” is configurable; set Prefix for Course Content in Settings to
Week, Day, Module, or anything else (§2.7).
4.2 Building a chapter
Click Add Chapter and give it a title and description.
Each chapter row carries:
an eye toggle: “Click to show this chapter to students” / “Click to hide this chapter from students”
Add Content ▾: Section, Quiz, Document, Video, Url
a ⋮ menu: Edit Chapter, Delete Chapter, Clone Chapter, Reorder Content, Import Concept
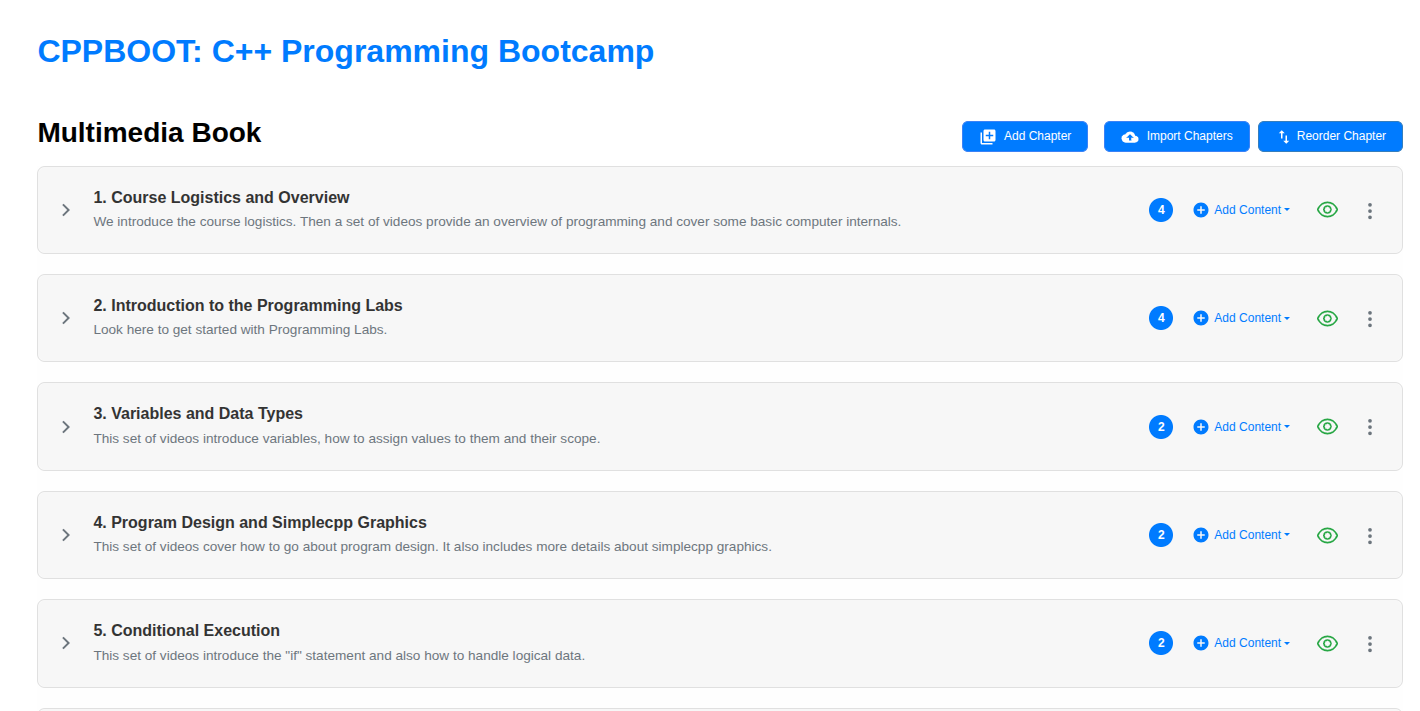
Delete may be missing from the ⋮ menu. With content protection on (the default), only the course creator sees Delete Chapter and the Delete option on individual items — Instructors and Senior TAs do not (§2.7).
Hidden means invisible, not greyed out. Students do not see hidden chapters at all, and the Next/Previous buttons skip over them silently. See Appendix A §A.2.
Reordering
Reorder Chapter turns the list into drag-and-drop and the button becomes Save Current Order. Nothing is stored until you click Save. The same pattern applies to reordering content within a chapter.
4.3 Adding content
Video
Title and a Video File are required. You may also add a Description, a
Camtasia Config File (.xml only), and Slides etc…, a file of any type that
students can download.
Accepted formats: .avi, .mp4, .mpeg, .ogv, .ts, .webm, .3gpp
Files over 1 MB upload in 512 KB chunks with a progress bar.
⚠️ There is no resume. If the connection drops part-way, the upload has to start again from the beginning. Retrying a new (not edited) video also leaves the abandoned half-uploaded copy behind on the server.
Document
Title is the only required field; the file itself is optional. The add form places
no restriction on the file type, but the edit form accepts only the previewable
formats below. Students can preview .pdf, .doc, .docx, .ppt, .pptx, .xls,
.xlsx, .txt, .odt, .csv, .htm, .html, and images (.bmp, .gif, .jpg,
.jpeg, .png, .tiff). Anything else is download-only.
URL
Title required, then one or more links. A malformed link is rejected with “Invalid URL (must start with https:// or http://)”.
The check is looser than the message suggests: any well-formed URL passes, including
ftp://andmailto:links. Usehttp://orhttps://if you want the link to open in the student’s browser.
Quiz
Title required, plus an optional Description and an optional Quiz File to
import questions from. Accepted: .csv, .txt, .odt.
4.5 In-video quizzes (markers)
Open a video to reach the video page. The Chapters & Markers panel is where in-video quizzes live.
Adding a marker
Play or scrub to the moment you want.
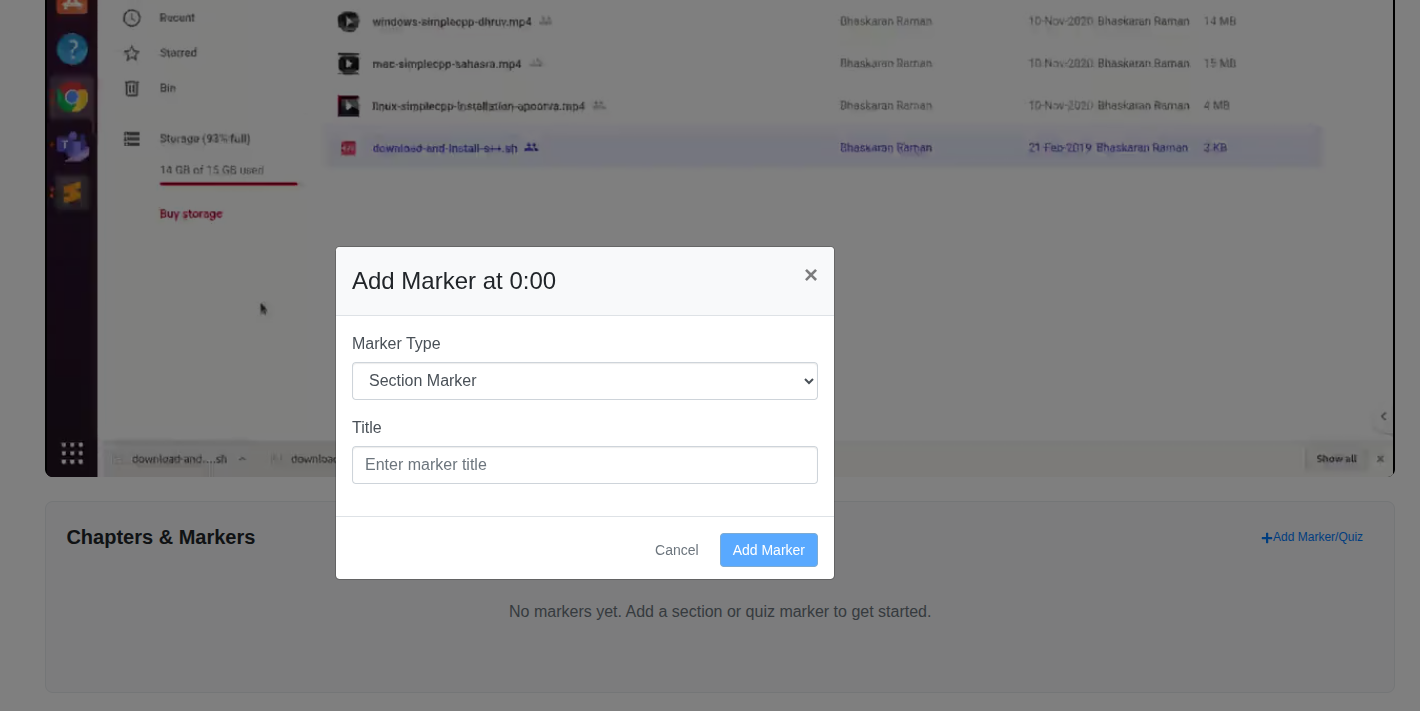
Click Add Marker/Quiz. The dialog is titled Add Marker at the exact timestamp.
Choose Marker Type: Section Marker (a chapter point in the video) or Quiz Marker (an interruption with a question).
Give it a Title (required).
For a quiz marker, set Quiz Type to Add Question or Add Module.
A thumbnail of the current frame is captured automatically as the marker image.
Only one marker per timestamp: “A marker already exists at this timestamp”.
Bulk import and export
Actions ▾ → Export All Quiz ODT and Import All Quiz ODT move every in-video question for that video in one file. This is much faster than authoring question by question for a video with many checkpoints.
What students experience
The video pauses and the question appears over it, with ↺ 5 sec and continue buttons.
⚠️ Students can switch in-video quizzes off entirely with a toggle under the player. Treat them as formative practice, not as a checkpoint you can enforce.
4.6 Reusing content
You do not have to rebuild material each term.
Action |
Where |
|---|---|
Clone Chapter |
Chapter ⋮ menu: duplicates within the course |
Import Chapters |
Top of the Multimedia Book |
Import Concept |
Chapter ⋮ menu: pull individual sections in |
Clone an item |
Item ⋮ menu |
Move an item |
Item ⋮ menu: into a section of the same chapter, or — for an item already inside a section — into another section or back out to Outside Section (Chapter Level) |
Import Chapters offers three routes:
Select a file:
.tar.gz,.tar.bz2,.tar,.gz,.bz2, or.zipProvide a link: an export link from another course
Select from existing courses: browse your other courses and tick the chapters you want
Route 3 is the quickest way to carry a course forward to a new offering.
4.7 Publishing content to students
Content is invisible to students until published. Work top-down: a published item inside an unpublished chapter is still invisible.
Use Student View to check what students actually see before you publish. On a quiz it is a toggle in the header; on a video it sits inside the Actions ▾ menu.
Previous: 3. People and Enrollment · Next: 5. Labs and Activities